
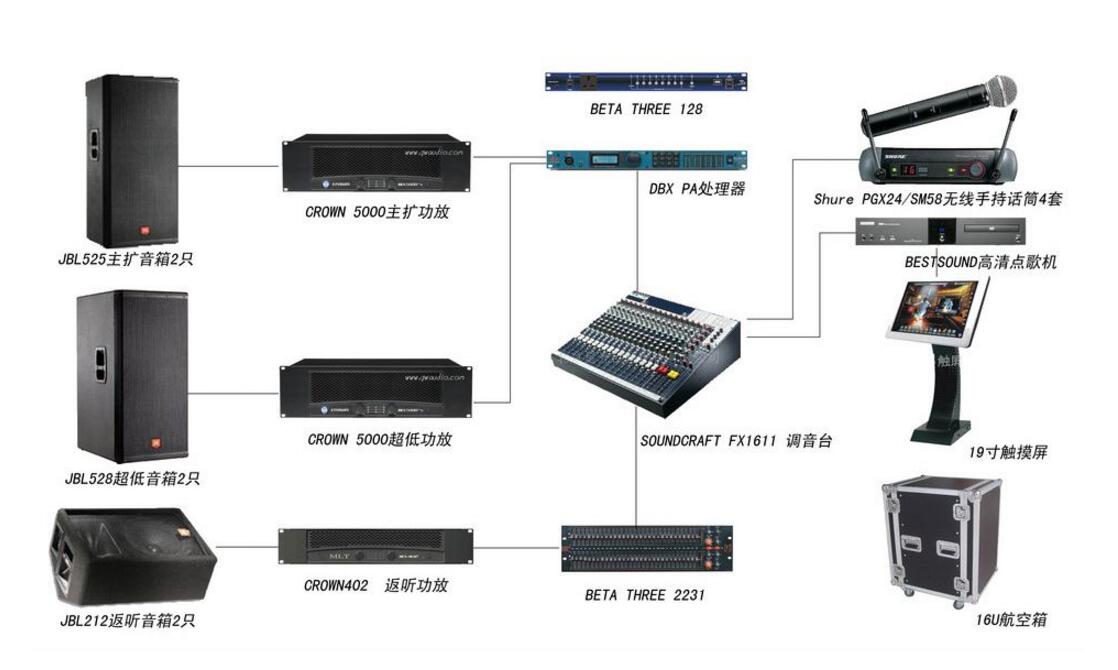
What are the requirements for troubleshooting the sound reinforcement system?
1. The sound reinforcement system sometimes emits a "click" sound, especially during the playing of music.
Cause of failure: There is a phenomenon of joint welding between the equipment of the sound reinforcement system. When there are music signals, the virtual solder joint makes the signal intermittent
Solution:
(1) It is necessary to thoroughly inspect the wiring of each channel equipment. It is better to re-weld each connection point.
(2) If the connection solder joints are thoroughly inspected, the phenomenon of "observation" may still occur. The connection line may be disconnected. Check each of the wires with a multimeter and replace the cables with broken wires inside.
2, sound amplification system without sound
Failure reason: The power plug of one or several devices in the connected audio equipment is not inserted properly
Solution: Check the power terminal board so that the socket contacts well
3, when the sound reinforcement system is muted, the hum sound is serious
Cause of failure: poor connection or false welding of the connection shield of each channel device
Solution: Carefully check the shielded wires between the devices and try to use soldering
Fault reason: The device with three-pin power plug is connected to the two-wire input socket, and the two-phase power cord is reversed to the neutral wire.
Solution: The two-wire input socket, neutral line and fire line must be reversed. In general, the left foot of the socket is a fire wire and the right foot is a neutral wire. Power plug board should be configured with three legs, and the middle and top pins should be connected to earth ground to ensure power safety
Cause of failure: Some audio devices use two-pin plugs, but some devices must use three-pin plugs. Otherwise, AC induction may occur during connection, leading to hum
Solution: Turn the plug of the audio device of the 2-pin plug upside down
4. During the process of sound reinforcement, a group of speakers or two groups of speakers on the left and right channel ports suddenly sounds silent
Cause of the fault: Under normal circumstances, it is due to the amplifier overloaded or the sound box is subjected to too much sound power and burned.
Solution:
(1) Replace the amplifier or speaker
(2) Replacing abnormally paired high-power transistors to repair the power amplifier must pay attention to the occurrence of such situations. All of them are caused by overload. Attention should be paid to operational issues during tuning. To protect the amplifier or speaker, sound reinforcement system can consider adding limiter
5. In the karaoke hall, the vocals of the singers are separated from the playing music accompaniment and are not merged.
Cause of failure: The left and right audio channels of the sound source enter the mixer, and the panning buttons on the corresponding channels are randomly placed, causing chaos.
Solution: Correct the adjustment of the corresponding channel panning knob so that the console's output signal retains the sound image of the original sound source
The reason of the trouble: The room equalizer only compensates for the sound of music, or the room equalizer room equalization curve is not reasonable
Solution: Re-adjust the room equalization compensation curve
6. When the audio system and the lighting system are operating at the same time, the acoustic noise of the sound system is very loud. After the lighting system is turned off, the sound system operation is inaudible.
Cause of failure: Sound system and lighting system share the same single-phase power. The thyristor of the lighting system has a large operating current and is an AC pulse type. It is directly coupled to the input of the expansion device through the power lead, resulting in a large hum
Solution:
(1) Single-phase power supply for audio system and another single-phase power supply for lighting system
(2) An isolation transformer is used for the power supply of the sound system. The power of the isolation transformer should be higher than that of the sound system.
7. The effect of singing sounds sounds small and not full
The reason of the failure may be that only the single-channel effect sound of the effect machine is used, or the two-input and two-out connections of the effect machine are not used.
Solution: The general effect machine has left and right channel input and left and right channel output, try to connect in this way
8, the effect of singing voice processing did not join
Cause of the malfunction: The vocals did not enter the effect machine
Solution: Open the corresponding auxiliary knob on the singing channel, open the auxiliary knob sent by the auxiliary bus, observe the input signal indicator of the effect machine, and see if there is any input signal.
Cause of failure: The effect sound sent by the effect machine is not programmed into the left and right channel buses or the group bus.
Solution: Press the button programmed into the corresponding bus
Cause of the malfunction: The effect machine is damaged
Solution: replace the effect machine
9, microphone into the mixer silent signal
Cause of failure: poor microphone switch contact, microphone switch is not open, or the microphone is damaged
Solution: Check the microphone cable, turn on the microphone switch or change the microphone
10, handheld stage wired microphone, slightly swinging motion, sound box issued a "click" sound
Cause of failure: poor microphone switch contact
Solution: Replace the microphone switch, or re-weld the switch wiring
Cause of the fault: The microphone terminal appears off-line, or the shielded cable runs into the signal line
Solution: Unpack the card connector, secure the disconnected wire, and clearly separate the shield and signal wires.
11, left and right channel speaker sound unbalanced
Fault reason: The sensitivity of the left and right channel speakers is different
Solution: Adjust the output levels of the left and right channels so that the sound of the speakers is nearly the same
Cause of failure: Unbalanced output signal of left and right channels
Solution: Adjust the device input level for each channel to approximately the same indication
12. When a single microphone is connected, the volume is larger. When two microphones are connected, the volume decreases
Cause of failure: Inverting the signal of two microphone input mixers
Solution: If the mixer has an inverting button for each input, press one of the two mic inputs and press the invert button. If the mixer does not have an invert button for each input, one of the microphone signals will be used. Welded wire, welded after reconciliation
13. After the wireless microphone is turned on, aim at the microphone and speak without sound
Cause of the problem: Insufficient battery on wireless microphone
Solution: Replace the battery
Cause of malfunction: Tuner volume is not turned on
Solution: Turn on the tuner volume switch and exceed 3/5
Cause of failure: Tuner receiving antenna angle is not adjusted
Solution: Change the receiver antenna angle of the tuner to avoid blind spots in the active area of ​​the host.
14, left and right channel speakers are split type, each speaker sound uneven
Fault reason: The two-channel electronic crossover frequency divider is not adjusted well
Solution: According to the use of divider, carefully adjust the crossover frequency of the high and low ends
15, the left and right audio channels have output, no sound signal output after entering the mixer
Cause of the problem: The set value attenuation button of the corresponding input channel on the mixer is pressed
Solution: Eject the corresponding channel's setting attenuation keys on the mixer
Cause of failure: Gain adjustment on the corresponding channel is at the lowest position
Solution: Turn on the gain adjustment of the corresponding channel and place it on the 2/3 position
Cause of failure: The panning button on the corresponding channel is placed opposite to the input left and right channel signals.
Solution: Position the panning button on the corresponding channel in accordance with the input left and right channel signals
Cause of failure: Poor contact or disconnection of the input mixer plug
Solution: check the input plug, firmly welded
Cause of failure: Poor contact or take off of the mixer output
Solution: Check the mixer output plug, connect it properly, and firmly solder
Cause of failure: The input signal is not programmed into the corresponding output bus
Solution: Press the edit button for the corresponding output
16, sound source sound, sound reinforcement system speakers silent
Cause of failure: No sound signal is output from the sound source, or there is a short circuit or open circuit at the output socket of the sound source device
Solution: Repair the sound source device or replace the sound source device. Carefully check the sound source in the wiring and plug sockets, eliminate short circuit or open circuit
Cause of the fault: Open or short circuit between the cables between the devices
Solution: Carefully check the connection status of each device's wiring and plugs and sockets, and eliminate the need for dummy welding, desoldering, and short-circuiting.
Cause of failure: One or several power switches of the serial connection device are not connected, and the acoustic signal is interrupted
Solution: Turn on the power of the audio device
Cause of malfunction: Sound source button misalignment on mixer input channel
Solution: Correctly place the sound source switch button
17, left and right channel speakers which way tweeter (high-frequency head) no high
The cause of the malfunction: The speaker tweeter overload burned
Solution: The power amplifier two input signals are reversed. If the speaker tweeter still has no high tone, the tweeter is burned and the voice coil should be replaced.
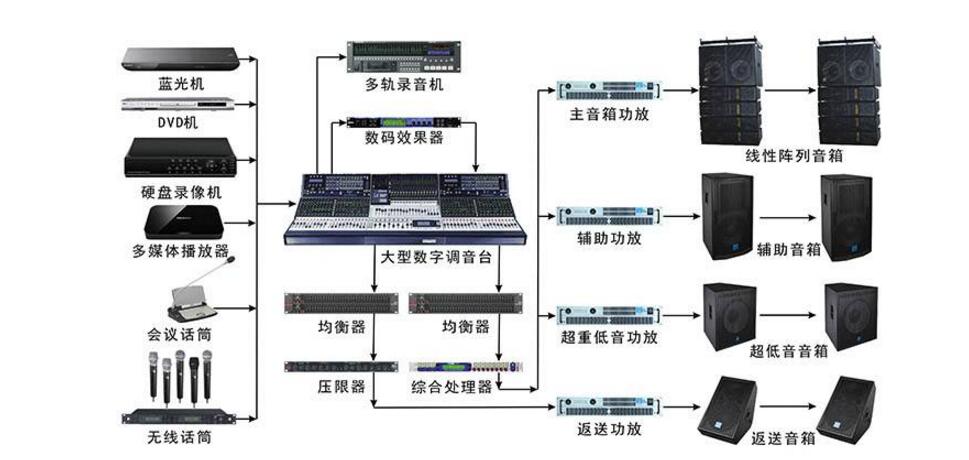
From a maintenance perspective, professional audio maintenance is difficult. One is the lack of maintenance information. In particular, imported audio equipment generally does not provide circuit schematics. Circuit printed board drawings are even more difficult to find. There is not much information on professional audio maintenance experience, which adds a lot of difficulties to maintenance work. The second is that professional audio equipment is more advanced in technology, involves more new knowledge, there are many factors of failure, and maintenance personnel need to consider more issues.
1, the requirements of theoretical learning
(1) It is necessary to understand the system diagram, understand the various unit devices that make up the system, figure out the flow of signals, and can associate the labels in the schematic with the devices in the actual system.
(2) To understand the working principle of the system components and the circuit part, some necessary calculations will be made and a brief graph can be drawn.
2. Actual hands-on requirements
(l) Proficiency in the identification and detection of equipment commonly used in sound reinforcement systems and the ability to perform necessary repairs and substitutions.
(2) Grasp the basic method of finding faults, and quickly and accurately find out where the fault is located.
(3) Have good hands-on ability in welding, debugging, disassembly, etc., develop patience and meticulous work habits.
(4) There is a set of handy maintenance tools and instruments that are available in all varieties.
The maintenance of professional audio equipment is a science, and it is necessary to constantly sum up experience, pay attention to the collection of technical parameters of the audio equipment, especially the wiring diagram of the professional sound reinforcement system, circuit schematic and printed board diagram, as much as possible to collect professional audio The maintenance of examples, continue to learn new knowledge in the field of audio technology, to lay a solid foundation for improving the maintenance level of audio equipment.
There are many reasons for the failure of audio equipment, and there are certain links between certain failures and causes. Maintenance personnel have a certain degree of maintenance conditions, in accordance with the maintenance procedures, the use of maintenance equipment and maintenance tools, commonly used fault diagnosis methods to repair sound equipment failure. Therefore, for maintenance personnel, not only theoretical basis, but also familiar with a variety of maintenance equipment, master the use of the instrument and the use of skills, master the basic methods of quickly determine the system failure and testing equipment, through repeated practice, can certainly Skilled in the maintenance of professional audio systems and equipment.
The fault diagnosis of the sound reinforcement system generally includes four steps: "ask," "look," "listen," and "measure."
"Q" is not in a hurry to start the inspection, but first to understand the basic situation, we must understand the working status of the audio, work environment and use, etc., but also to inquire about the process of failure, the phenomenon and the original situation, Something.
"Look" means that on the basis of the inquiry, there is no power, but the sound reinforcement system should be checked to see if there are any abnormalities, such as loose connectors, broken connectors, or obvious burn marks in the equipment.
"Listening" means that after "asking" and "looking", power on the audition, check whether the fault condition is consistent with the phenomenon reflected by the user, and pay attention to those parts where abnormality occurs. The sound effect is a comprehensive manifestation of the technical indicators of the sound reinforcement system. Therefore, by listening to the sound, you can directly understand the actual appearance of the fault.
"Measurement" refers to the use of electronic instruments to detect the technical parameters of the audio circuit (such as voltage, resistance, etc.) and compare it with normal operating conditions to find the cause of the fault.
By summarizing the above four steps, basic judgment methods such as the direct inspection method and the measurement method can be summarized. The following are introduced separately.
1, direct inspection methodThe direct inspection method is a method of finding faults through the sensory organs such as the eyes, ears, nose, and hands of maintenance personnel without using instruments.
(1) Seeing
Observe the working status of the system. Check whether the keys and knobs are in the correct positions or whether they are damaged. Check whether the display of each device is normal. Turn on the suspected audio equipment to see if the internal connectors are detached; if the printed board or integrated circuit has broken or damaged; whether the transistors, capacitors, and resistors have burned marks, whether they are cracked, loosened, opened, or touched. When the power is turned on, there are smoke and ignition in the system and equipment.
(2) hearing
Turn on the power, listen for crackles in the machine, whether there are abnormal noises in the motor and the belt conveyor, whether the power transformer has a large hum, and whether the system has whistling or clicking. Use sound to determine the cause of the fault and its approximate location.
(3) Nose sniffing
The odor system and the audio equipment have a scorched odor and high ozone discharge.
(4) touch
While the power is on, touch the components on the circuit board with your hand. Check for solder joints, open joints, looseness, and cracks. Check for good connector contact. After being energized for a period of time, touch the shell of the device and the power transformer, the power supply tube, the motor drive integrated circuit, and other suspicious parts. However, this check should pay attention to safety.
2. Measurement methodThe measurement method refers to the use of the instrument to detect the circuit of the malfunctioning system and audio equipment, and it is the most common method for overhauling the sound reinforcement system and the equipment circuit. By measuring equipment at all levels, you can find out whether the system's static working status is normal, and provide a basis for further determining the fault location.
(1) Measuring voltage method
The key to using the voltage measurement method is to know the normal voltage value of the tested part, such as the AC and DC voltage of the amplifier power supply, the 48V phantom voltage of the mixer, and the line level of the audio equipment signal connection. It is best to prepare in advance a system diagram that indicates the voltage value, which will help improve the inspection efficiency. If the voltage value is not marked on the drawing, it can be calculated according to the system or circuit schematic.
(2) Measuring resistance method
It refers to measuring the resistance value of equipment, components and ground with a multimeter directly to find and find the fault location, such as speaker input impedance, transmission cable resistance and so on. Use this method, it must be carried out without power. In the actual test, the performance of the audio equipment can be directly measured on the system without disassembling the equipment from the system. However, the device under test is connected to the circuit of the entire system, so the resistance measured by the multimeter reflects the total resistance of the measured branch and the external branch connected in parallel. In general, the total equivalent electrical limit is smaller than the measured branch resistance.
3, signal injection method and waveform observation methodThe signal injection method and the waveform observation method are methods for repairing a sound reinforcement system and a sound machine by using test instruments such as a dedicated test disc, an audio signal generator, a tracking oscilloscope, and a millivolt meter. This method is fast and accurate for checking the dynamic failure of the sound system.
(1) Signal injection method
The signal injection method is a method of injecting various test signals generated by the signal source into the overhauled sound reinforcement system and the whole circuit, and then judging the failure through the response sound of the speaker. When the signal injection method is used for fault inspection, the order of inspection from the rear to the front shall be followed. The test signal is injected into a certain level, and the fault phenomenon appears, indicating that the fault is located here. In order to quickly find the fault location, it is necessary to analyze and determine the parts or equipment that may be involved in the fault. Then, by using the method of segmented injection signal, the fault range is roughly determined, the segmentation segment is detected, and the fault range is gradually narrowed down, so that the fault can be quickly found. The signal injection method is suitable for checking the failure of the entire sound reinforcement system.
(2) Waveform observation method
The waveform observation method refers to the method of observing the signal waveform step by step with the oscilloscope according to the sequence of the signal flow in the system. By detecting the width, amplitude and period of the signal and other parameters, the detection result can be compared with the waveform and parameters given by the system to find the fault location. The waveform observation method is performed from front to back and level by level. If the output signal of the front audio source device is normal, the output signal of the rear mixer is not normal, and the fault may occur at the mixer.
In short, the signal injection method and waveform observation method is to use the test equipment to find the circuit fault, not only can improve the inspection speed, but also can reduce the equipment damage. Some potential faults that are not easy to find can be solved in the detection in time.
4, bypass methodWhen it is suspected that a piece of equipment may be faulty, it is sometimes possible to pass the signal over this grade of equipment and pass through to the next stage to bypass this stage of equipment (By-Pass) and observe whether the fault is eliminated. This inspection method is the bypass method.
The bypass method can be used to determine which stage of the device the noise, hum, distortion, and silent noise occurred. For example, the sound emitted from the speaker is obviously distorted. After checking, it is confirmed that the mixer and power amplifier have no problem. If it is suspected that the equalizer is faulty, the equalizer can be bypassed. If the distortion disappears, it can be concluded that this level of fault is. If the system is completely silent, after inspection, it is suspected that the compressor is damaged. Remove the compressor from the system and connect it to the form of a mixer-equalizer-amplifier. If the fault disappears and a sound is heard from the speaker, it can be concluded that the compressor is damaged.
Many devices (mainly sound processing devices) have bypass switches. By using this switch, the device can be bypassed to determine if the device is faulty. Sometimes the bypass switch on the device cannot bypass the device because the bypass switch of these devices can only work when the power supply is normal. At this point, the wiring can be adjusted to bypass the device and perform a bypass check.
5, circuit detection methodBreak detection method is a detection method that uses a certain part of the sound reinforcement system, or removes a device to reduce the fault range. This method is best suited for short-circuit fault detection in sound reinforcement systems.
Divide the system to eliminate the influence of the equipment related to the fault to judge the working status of the equipment and determine the fault. For example, the DC fuse is blown, indicating that the load current is too large, causing the output voltage of the power supply to drop. To find out first which current is large, the current meter can be connected to the fuse block of the DC stabilized power supply, and then the equipment with doubtful points can be disconnected to observe the change of the total current. If the current returns to normal after disconnection, it can be determined that the fault is in the device.
Use the disconnection detection method to determine whether to disconnect a device without affecting other devices, so as to avoid damage to other devices, resulting in serious consequences such as system damage. For some high-voltage, high-current systems, do not disconnect the device casually to avoid damage to other systems. For example, if you simply disconnect the limiter, it will pose a danger to the amplifier at the later stage. Therefore, be cautious when using disconnection detection.
6, substitution testSubstitution detection method is to judge the quality of the original connector or equipment by replacing the defective connector and equipment with good performance connectors or a good audio equipment.
Sound reinforcement equipment is generally configured in two channels. Although it is not necessary to use stereo sound amplification, but because the device is two-way symmetric, the most commonly used "replacement method" can swap the left and right two-way equipment to determine the fault. For example, it is found that the left-side output of the device is seriously distorted. When it is changed to a certain level, it is found that the right-side distortion occurs, and it can be determined that the level has a fault. This method is often used when repairing audio equipment and systems. For example, if the volume of the microphone drops, the internal disconnection of the cassette connector, and the partial short circuit of the amplifier, etc., the substitute detection method can quickly find its fault.
It should be noted that the replaced equipment must be of the same specifications and performance as the original one. We cannot replace high performance with low performance, nor can we replace high power equipment with low power equipment to prevent burnout of the system and equipment. The use of replacement detection method must be very careful not to blindly replace, but also avoid the wrong connection or short circuit other equipment in the replacement, otherwise not only can not find the fault, it may also expand the scope of its fault, or even damage the sound reinforcement system.
7, jump level detection methodThe so-called step-by-step inspection is, in fact, not to carry out maintenance on a step-by-step basis. Instead, it passes over one or more levels in the faulty system and directly checks a certain level of equipment that is suspected to be faulty. This method is particularly suitable for troubleshooting faultless or low-noise faults. If the sound reinforcement system has a normal screen display and no sound is emitted, the signal injection method can be used in combination with the detection of several parts to quickly find out where the fault is located.
Cell Phone Holder Ring, Iphone Charging Stand, Mobile Phone Holders Ring, Phone Holder Ring source manufacture in China.
Shenzhen Chengrong Technology Co.ltd is a high-quality enterprise specializing in metal stamping and CNC production for 12 years. The company mainly aims at the R&D, production and sales of Notebook Laptop Stands and Mobile Phone Stands. From the mold design and processing to machining and product surface oxidation, spraying treatment etc ,integration can fully meet the various processing needs of customers. Have a complete and scientific quality management system, strength and product quality are recognized and trusted by the industry, to meet changing economic and social needs .


Phone Holder Ring,Iphone Charging Stand,Mobile Phone Holders Ring,Ring Smartphone Holder
Shenzhen ChengRong Technology Co.,Ltd. , https://www.dglaptopstandsupplier.com